It Has Begun

SQCTS

Member
Ok I fellow E-Charger comrades, I have startes my build. I chose to go the direct drive route as it just seems the most efficient way of doing it.

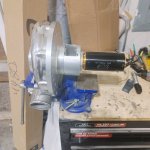
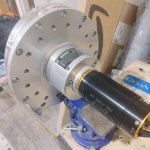
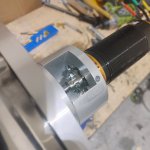
Below you will find a few pictures of my direct drive setup using the SpeedMaster P-2 supercharger that was recommended to start with and the TP Power 5870 750KV motor.

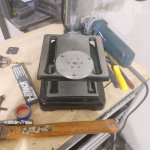
This wasn't an easy thing to do without a lathe or CNC. I had do it with a good ole 4.5" grinder, files and a drill press and a ton of bad words.

Went thru about 3 different ways of doing it, all of them would have and can work. In the pictures below you will find a plate I made to mount it and was going to use the same 3 mounting holes as the factory spinal cover however after some mishap and bad choices it ending up bing about 1.25" taller than I think I could fit in my space in the car and would've had buy longer screws which is not and issued just not what I wanted. So after all the work making the plate I decided on first thought of just using the spinal cover. Which still about .75" taller than I had planned, but it still should fit without to much fuss.

Testing on the beach will start this weekend
 

Attachments

  • 20211110_144902_HDR.jpg
    20211110_144902_HDR.jpg
    393.9 KB · Views: 27
  • 20211110_145027_HDR.jpg
    20211110_145027_HDR.jpg
    385.9 KB · Views: 24
  • 20211110_145001.jpg
    20211110_145001.jpg
    404.8 KB · Views: 29
  • 20211110_145018_HDR.jpg
    20211110_145018_HDR.jpg
    327.7 KB · Views: 31
  • 20211110_145030.jpg
    20211110_145030.jpg
    479.5 KB · Views: 30
Sorry guys. So they are called flange couplers.

So I remove the shaft from the blower and milled it down to 10mm. I purchased a set of 4 10mm flange couplers.

The motor shaft is 8mm so ordered a set of 4 8mm flange couplers also. The 10mm and 8 mm couplers are the exact so diameter at 32mm. The flange couplers are steel so are pretty darn strong. The flange couplers have 4 holes in them.

So I put the blower shaft on the drill press and made 2 small indenture in the shaft on opposite sides so the flange coupler 2 set screws have a better setting position and not just tightening down on the rounded surface of the shaft. Did the same to the shaft of the motor.

So one flange coupler on the blower shaft and one on the motor shaft. Then 4 steel screws with nuts to hold the couplers together.

Now I coupled the couplers together first and put them on the blower shaft. Next I attached the factory cover the motor. Than I put it all together.

If you look you will notice there is a small hole drilled in the side of cover near the large opening. This was done so I could access the set screws for the motor coupler.

Blue Loctite on all set screws and red on the 4 flange screws and nuts.

See this picture. This was when was test fitting everything together to alignment.
20211110_145018_HDR~2.jpg
 
Last edited:
So this assumes perfect alignment ? Which could be interesting(Or not).
Perfect alignment as in motor shaft with blower shaft? Your right it could be very interesting, Or Not. Lol

I measured and measured some more on the inside the cover and on the outside. Measurements says it is centered it looks centered.

I tested run out, well kind of. Assuming all the factory parts are centered and even, I took a set of digital calipers and measured from the opening to the couplers. I rotated the shaft by hand, which the motor has 18 notches or stopping points back to center. I didn't see any difference in measurement, 1.47mm at every rotation. Now could it be some thousands of mm off very possible. But I didn't pull out my calipers i use for reloading ammo to see as they go down to the thousands of a mm. I might need to do that.
 
That is fantastic. Do you have a way to "spool" it up at a relatively low rpm? Using MkngStffAwesome's new code and some sort of ESC?
 
That is fantastic. Do you have a way to "spool" it up at a relatively low rpm? Using MkngStffAwesome's new code and some sort of ESC?
Alex that is the plan. I have an idea to try it with an E-bike thumb throttle running thru the Adriano and see if that will work. Going to try it this weekend if I get some down time.

Plan it to simulate what it will see in the car or as close as I can as possible on the beach before i ever install it.
 
So the precision depend on the mounting point of the motor?
I would have to say yes. Alignment of the motor shaft in relation to the blower shaft is critical.

I made a Plexiglas template first for the mounting points of the motor. Used plexi so could have a better visual of the mounting of the motor.
 
If / when this doesn't work very well.. buy some lock nuts and then dont tighten them up much to allow the two faces of the couplers to slide across one another.. Thus allowing for some small miss alignment.
 
If / when this doesn't work very well.. buy some lock nuts and then dont tighten them up much to allow the two faces of the couplers to slide across one another.. Thus allowing for some small miss alignment.
Hmmmmm ok i have lock nuts. But not sure i want the couplers moving around at all. Seems like it would cause unwanted vibrations, But understand your logic.

But why wouldn't this work? It seem fine last night on a quick spin with one battery. However that battery wasn't completely charged.
 
Last edited:
Direct drive:


Also true voltage was 50.5 volts for test 2 and 67 volts test 3.

I honestly beat on this thing a for about 2 hours longs run time was about 2 mins straight at about from 65- 75% of full power. It took a beating. The motor made the most heat.

ESC was barely warm and the batteries still cold to the touch. After all that the batteries still measure 3.93 to 4.02 volts on all cells
 
He had Flier make him a custom unit. But what's really impressed me is the incredibly low voltage drop from those batteries... A LOT better than my Zeee batteries. Plus he's run his blower for longer than I ever have. That coupler he built appears to be fine (and easy to implement). I think this represents the easiest/most effective effort to date!
 
Top